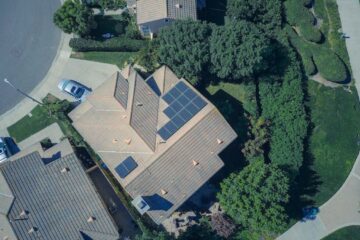
The solar panel installation process involves much more than putting equipment on a roof. For a US homeowner, the schedule includes property assessment, system design, permits, utility review, installation, inspections, and permission to operate. The crew’s time at your house may be brief compared with the administrative work surrounding it.
This guide explains those stages, what can delay them, and which questions help you plan. Treat any schedule as a project-specific estimate, not a promise. As of October 9, 2026, financing and incentive assumptions also deserve a fresh check before you sign.
Start With Milestones, Not a Date
Ask installers to separate the expected construction date from the expected operating date. A completed array may still need inspection approval, meter work, or utility authorization before routine operation is allowed. Your contract should explain these dependencies rather than treating “installation complete” as “generating bill savings.”
A straightforward project might move through the stages over several weeks, while roof repairs, electrical upgrades, revisions, or utility requirements can extend it into months. Neither range is a guarantee. Request estimates based on recent projects with your permitting office and utility, not a national sales script.
- Design approved: You accept the layout and equipment.
- Approvals secured: Required permits and applicable preconstruction utility reviews are complete.
- Construction finished: Equipment is installed but may not be authorized for normal use.
- Operation authorized: Required inspections and utility permission are documented.
Before Signing: Check the Property
Gather electricity bills showing monthly usage in kilowatt-hours, or kWh. Tell the installer about planned changes such as an electric vehicle, heat pump, or household addition. Historical bills provide a starting point, but they may not represent future demand.
The site assessment should examine shading, roof condition, usable roof area, electrical service, and equipment locations. Ask whether the design requires structural review, a main-panel upgrade, trenching, or tree work. Remote imagery can support an initial proposal, but concealed wiring or roof issues may emerge during an on-site visit.
If the roof may need replacement soon, compare doing that work first with the disruption and cost of removing and reinstalling panels later. Also check homeowners association procedures where applicable. Local law may limit association restrictions, but that does not automatically eliminate a submission requirement.
Design Decisions That Affect Timing
Before approving the design, review panel placement, conduit routes, inverter location, and access clearances. Ask what happens if the specified equipment becomes unavailable: substitutions should receive your approval and may require revised permit or utility documents.
Solar-only and solar-plus-storage projects can have different scopes. Battery backup may require additional equipment, electrical changes, and a decision about which circuits receive power during an outage. Ordinary grid-tied solar generally shuts down during an outage; backup requires equipment and controls designed for safe islanding from the grid.
Battery power, measured in kilowatts, or kW, describes how much load it can serve at once. Energy capacity, measured in kWh, helps determine how long it can serve that load. Ask for a critical-load plan rather than assuming “whole-home backup” covers every appliance simultaneously.
If comparing Tesla Powerwall, Enphase, and FranklinWH proposals, focus on compatibility, backup configuration, expansion options, service arrangements, and current warranty terms. Verify the exact models and installed scope; brand names alone do not establish equivalent capabilities or timelines.
Understand the Permit Queue
The solar permit timeline depends on your local authority’s process, application quality, and project complexity. Some jurisdictions offer automated review for qualifying residential systems; others require staff review. Structural questions, unusual roof layouts, and electrical upgrades can add review steps.
Ask who submits the application and who responds to correction notices. An installer saying “we are waiting on permits” should be able to identify the submission date, application number, reviewing office, and whether corrections remain unanswered.
Permitting and utility interconnection are separate processes, although parts may run concurrently. A building permit is not utility permission to export electricity. Likewise, utility acceptance of an application does not replace local construction requirements.
- Request confirmation that a complete permit application was submitted.
- Ask whether structural or electrical documents are outstanding.
- Get an updated estimate after any correction request.
- Keep approved plans accessible for installation and inspection.
Track Utility Review Separately
The installer usually helps prepare the interconnection application, but confirm that responsibility in writing. The utility may need equipment specifications, a system diagram, account information, and proposed export settings. Batteries and export-limited designs can change what must be reviewed.
Depending on local procedures, review may identify meter changes or service work. Ask whether any work must happen before installation and who pays for it. Do not assume that a nearby home’s approval predicts yours; electrical conditions and project sizes can differ.
Review the applicable billing arrangement before finalizing system size. Net metering and net billing are not interchangeable, and exported electricity may receive neither the retail rate nor a cash payment. California’s net billing arrangements include variable export values, making production timing and household consumption important. Your utility’s current tariff controls the details.
Prepare for Installation Day
Once approvals, materials, and crew availability align, confirm the work window and weather policy. A straightforward rooftop installation may take only a few working days, but larger systems, storage, difficult access, or electrical work can require longer. Get an estimate for your scope.
Clear driveway and equipment access, secure pets, and identify any areas the crew must avoid. Ask whether workers need attic access and when an electrical shutdown is planned. If someone relies on powered medical equipment, arrange a safe continuity plan before any interruption.
Request photos of roof attachments and concealed work when practical. Before the crew leaves, ask who handles debris, damaged landscaping, roof concerns, and unfinished items. Do not energize the system yourself; follow the installer’s and utility’s instructions.
Inspection Is Not the Finish Line
After installation, the local authority may inspect electrical work, attachment details, labels, and consistency with approved plans. A correction notice does not necessarily mean the entire project failed, but it can require another visit and delay final approval.
Ask the installer to send you the inspection result and identify who schedules any reinspection. Then confirm that the required completion documents reached the utility. An approved local inspection can still be followed by a utility processing period.
Before routine operation, obtain the utility authorization required for your project, often called permission to operate. At handoff, receive monitoring access, shutdown instructions, warranties, equipment details, and service contacts. Confirm who checks that monitoring works and who investigates missing production data.
A Hypothetical Project Calendar
Consider an illustrative project with a sound roof, no service upgrade, and equipment available. This is a planning example, not a typical completion promise:
- Weeks 1–2: Site assessment, usage review, and final design.
- Weeks 3–6: Permit and utility applications move through their respective reviews, where parallel processing is allowed.
- Week 7: Installation occurs after required approvals and scheduling.
- Week 8: Local inspection takes place and completion documents are submitted.
- Weeks 9–10: Remaining utility steps and authorization are completed.
If a panel upgrade becomes necessary in week 2, this calendar may no longer apply. If inspection requires a correction, the next available appointment becomes another dependency. Ask for a revised milestone schedule whenever the scope changes, rather than accepting the original finish date unchanged.
Protect Your Budget and Contract
Review payment milestones alongside the project schedule. Know whether a payment becomes due at equipment delivery, installation, inspection, or utility authorization. For financing, ask when interest and payments begin, particularly if utility approval takes longer than expected.
The federal Residential Clean Energy Credit under Section 25D is not available for property placed in service after December 31, 2025. A new 2026 installation should not be budgeted around that credit. State, local, and utility programs vary; verify current funding, eligibility, application deadlines, and reservation requirements independently.
“No-cost solar” generally describes financing, a lease, or a power purchase agreement—not free equipment. Legitimate assistance programs may exist, but verify the sponsor and terms. Ownership also matters when selling: leases, PPAs, and outstanding loans can introduce transfer, consent, payoff, or buyer-qualification requirements.
Your Preinstallation Checklist
- Confirm roof condition and responsibility for any repairs.
- Approve the final equipment list, layout, and backup scope.
- Record permit and interconnection application numbers.
- Identify the person responsible for each pending approval.
- Get written pricing and scheduling procedures for changes.
- Check payment dates against authorization milestones.
- Verify the export tariff and any incentive reservation.
- Arrange access, outage preparation, and handoff training.
Frequently Asked Questions
Can permits begin before design?
Preliminary research can begin early, but a permit application generally needs a sufficiently developed design. Submitting incomplete documents may create correction cycles rather than save time. Ask when the design will be ready for a complete submission.
Can I use solar before approval?
Do not assume so. Testing and commissioning may occur under specific procedures, but routine operation must follow local and utility requirements. Ask for written confirmation of the authorization that applies to your system.
What delay can I help prevent?
Missing homeowner information is one preventable source of delay. Return account authorizations, design approvals, and requested documents promptly. Keep records, but do not approve unfamiliar changes simply to preserve a projected date.
Does adding a battery take longer?
It can. Storage may add design decisions, equipment, permitting details, and utility requirements. Adding it after solar plans are approved can trigger revisions. Discuss backup goals before design begins, even if you ultimately defer the battery.
Plan Around Verified Progress
A useful schedule shows who owns each task, what must happen next, and which approvals remain. Track those milestones through final authorization—not just the day panels arrive—and keep your financial assumptions separate from optimistic completion dates.
This article provides general information, not legal, tax, financial, or engineering advice. Confirm requirements with your permitting authority, utility, installer, and qualified advisers.
Official References
https://www.energy.gov/energysaver/solar-energy
https://www.irs.gov/credits-deductions/residential-clean-energy-credit
https://consumer.ftc.gov/consumer-alerts/2024/08/how-avoid-getting-burned-solar-or-clean-energy-scams
https://www.cpuc.ca.gov/industries-and-topics/electrical-energy/demand-side-management/customer-generation